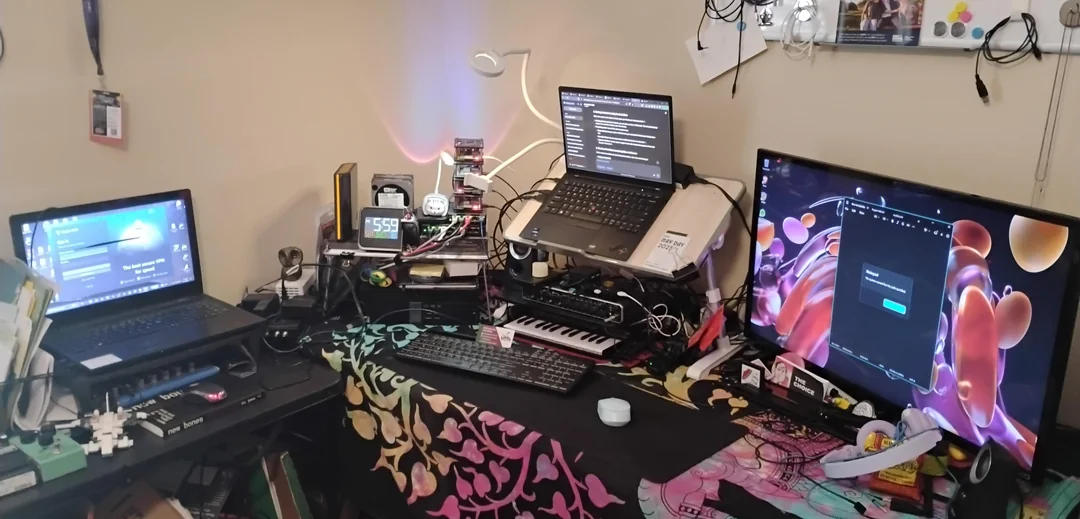
: A Generic Home Lab
Introduction
Why Build a Home Lab?
A home lab is essentially a mini data center set up right in your own living space. It can range from a single, low-power mini PC hidden behind a desk to a dedicated server rack filled with enterprise-grade network gear, switches, and uninterruptible power supplies (UPS).
Many people build home labs because they want complete ownership over their data. Instead of trusting third-party cloud corporations with their files, photos, and smart devices, they self-host.
Private Cloud Storage: Running alternatives like Nextcloud to replace Google Drive or Dropbox.
Local Smart Home Control: Using platforms like Home Assistant to manage smart switches, lights, and automated voice clients locally. This ensures your automated routines still work flawlessly even if your internet connection goes down entirely.
Media Streaming: Setting up personal media servers (like Plex or Jellyfin) to stream an owned movie and music collection without relying on changing streaming platform catalogs.
Breaking Things Safely: If you want to learn enterprise network configurations, cluster computing, or test out container environments like Docker, doing it on a production system at work is a massive risk. A home lab lets you experiment, break configurations, and learn how to rebuild them with zero real-world consequences.
Hypervisor Mastery: It provides a space to learn type-1 hypervisors (like Proxmox VE or VMware ESXi) to split one physical machine into dozens of isolated virtual machines (VMs).
Recommended Design Architecture
Basic Home Lab Configuration
A Home Lab self-contained in an inexpensive single mini-computer.
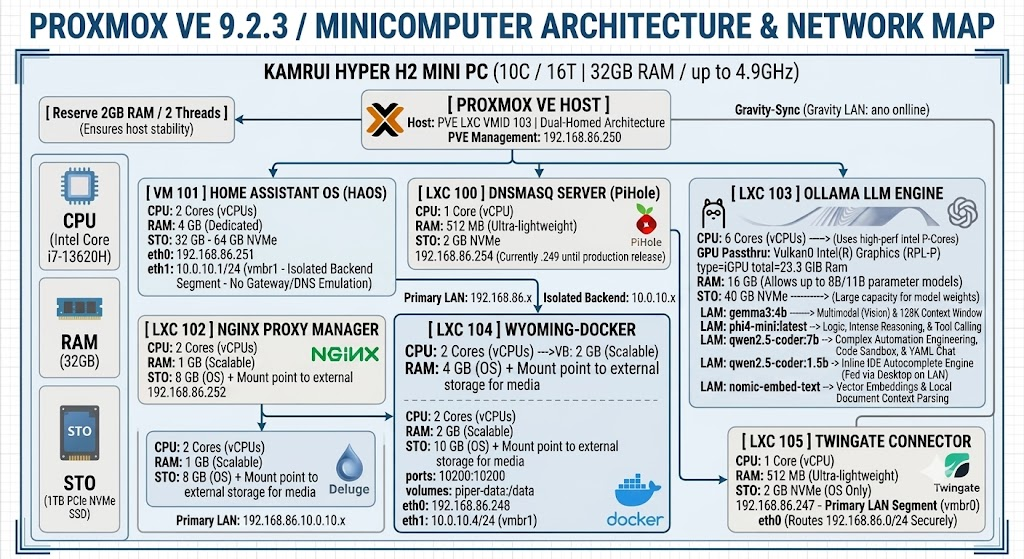
: Proxmox VE 9.2.3 / Minicomputer Architecture & Network Diagram
Note: If you want to use this information in an AI window – select this section into your chat window to reference the entire configuration. This can be helpful if you want to ask any AI questions regarding your Home Lab configuration. Just tell your AI client "gemini" to load this config your reference in your conversation. It might be helpful to tell your AI conversation:
"Please start a clean conversation, flush all buffers and caches and then load this config for reference."
========================================================================= Barnes Home Lab Configuration * * * * Compute Module * * * * KAMRUI HYPER H2 MINI PC (10C / 16T | 32GB RAM / up to 4.9GHz) Proxmox VE 9.2.3 / Dedicated Ethernet / Intel Core i7-13620H Integrated GPU: Intel UHD Graphics (13th Gen) / 1TB PCIe NVMe SSD ========================================================================= [ PROXMOX VE HOST ] --------- Reserve 2GB RAM / 2 Threads for overhead ] │ 192.168.86.250 ├──► [ VM 101 ] HOME ASSISTANT OS (HAOS) │ ├── CPU: 2 Cores (vCPUs) │ ├── RAM: 4 GB (Dedicated) │ ├── STO: 32 GB - 64 GB NVMe │ ├── MOUNT: /mnt/haos_backups <--- NFS Mount from Samba-NAS (/shares/backups/haos) │ ├── 192.168.86.251 - Primary LAN Segment (vmbr0) eth0 │ └── 10.0.10.1/24 - Isolated Backend Segment (vmbr1 - No Gateway/DNS Emulation) eth1 ├──► [ LXC 100 ] DNSMASQ SERVER (PiHole + Unbound) │ ├── CPU: 1 Core (vCPU) │ ├── RAM: 512 MB (Ultra-lightweight) │ ├── STO: 2 GB NVMe │ ├── Service: Primary Pi-hole DNS (Port 53 / 80) │ ├── Service: Unbound Local Recursive Resolver (Port 5335) │ └── 192.168.86.254 (Currently .249 until production release) ├──► [ LXC 102 ] NGINX PROXY MANAGER │ ├── CPU: 2 Cores (vCPUs) │ ├── RAM: 1 GB (Scalable) │ ├── STO: 8 GB NVMe (OS) │ ├── BIND MP: mp0: /mnt/pve/shares/certificates,mp=/etc/letsencrypt │ └── 192.168.86.252 ├──► [ LXC 103 ] OLLAMA LLM ENGINE │ ├── CPU: 6 Cores (vCPUs) ---> (Uses high-perf Intel P-Cores) │ ├── GPU Passthru: Vulkan0 Intel(R) Graphics (RPL-P) type=iGPU total=23.3 GiB Ram │ ├── RAM: 16 GB (Allows up to 8B/11B parameter models) │ ├── STO: 40 GB NVMe --------> (Large capacity for model weights) │ ├── BIND MP: mp0: /mnt/pve/models,mp=/root/.ollama/models │ ├── LAM: gemma3:4b ---------> Multimodal (Vision) & 128K Context Window │ ├── LAM: phi4-mini:latest --> Logic, Intense Reasoning, & Tool Calling │ ├── LAM: qwen2.5-coder:7b --> Complex Automation Engineering, Code Sandbox, & YAML Chat │ ├── LAM: qwen2.5-coder:1.5b -> Inline IDE Autocomplete Engine (Fed via Desktop on LAN) │ ├── LAM: nomic-embed-text --> Vector Embeddings & Local Document Context Parsing │ ├── 192.168.86.253 - Primary LAN Segment (vmbr0) eth0 │ └── 10.0.10.3/24 - Isolated Backend Segment (vmbr1 - No Gateway/DNS Emulation) eth1 ├──► [ LXC 104 ] WYOMING-DOCKER & OPEN-WEBUI │ ├── CPU: 2 Cores (vCPUs) │ ├── RAM: 2 GB (Scalable) │ ├── STO: 10 GB NVMe (OS) │ ├── BIND MP: mp0: /mnt/pve/shares/piper-data,mp=/var/lib/docker/volumes/piper-data │ ├── BIND MP: mp1: /mnt/pve/shares/whisper-data,mp=/var/lib/docker/volumes/whisper-data │ ├── BIND MP: mp2: /mnt/pve/shares/openwebui-data,mp=/var/lib/docker/volumes/openwebui-data │ ├── Docker Container: Wyoming-Piper (Port 10200:10200) │ ├── Docker Container: Wyoming-Whisper (Port 10300:10300) │ ├── Docker Container: Open-WebUI (Port 3000:8080 | OLLAMA_BASE_URL=http://192.168.86.253:11434) │ ├── 192.168.86.248 - Primary LAN Segment (vmbr0) eth0 │ └── 10.0.10.4/24 - Isolated Backend Segment (vmbr1) eth1 └──► [ LXC 105 ] TWINGATE CONNECTOR ├── CPU: 1 Core (vCPU) ├── RAM: 512 MB (Ultra-lightweight) ├── STO: 2 GB NVMe (OS Only) └── 192.168.86.247 - Primary LAN Segment (vmbr0) eth0 (Routes 192.168.86.0/24 Securely) |
|---|
Code 1: Barnes Home Lab Configuration
Installing your Home Lab on a Mini-Computer
Although this setup may seem complex, you can complete the installation in a day or two and have a complete, running system ready for a production rollout of your new Home Lab.
Step by Step instructions
To run Proxmox, Home Assistant, NGINX, PiHole, Twingate Connector and Ollama together, a Proxmox VE (PVE) base layer is the best approach.
Proxmox VE base layer
When running there are some recommended resource allocations that you will be asked for. Use the details presented in each section to allocate your resources efficiently to avoid crashing the host.
Step-by-Step Deployment Guide
Step 1: Download the latest Proxmox VE ISO
The official website is located at https://www.proxmox.com/en/downloads/proxmox-virtual-environment.
1. Flash it to a USB drive using BalenaEtcher or Rufus. |
|---|
Step 2: Setup Putty/ssh for easy communication with your new Home Lab.
To set up passwordless SSH login to a Proxmox VE server using PuTTY, you need to generate a key pair on Windows, add the public key to Proxmox, and configure PuTTY to use the private key.
Here is the complete step-by-step process.
1. Generate an SSH Key |
|---|
Step 3: Use Helper Scripts for Easy Setup of the remaining products.
If you do not think you want that specific product installed, then you may skip that section. Just be aware that when you get to the tools and backup sections below the scripts may change. If you do end up changing the scripts remember that you can comment on the lines by using a "#" at the beginning of the line you do not want executed. That way later you know what to uncomment if you change your mind.
Once Proxmox is installed,
open the Proxmox Web UI (https:// 192.168.86.250:8006)
select your main node
open the Shell
In this window you can execute simple commands and check for status if you desire
To use the community-standard Proxmox VE Helper-Scripts listed below to deploy your services instantly open a dedicated ssh window for running install scripts. Leave your Proxmox Web UI for small tasks.
PiHole (LXC 100)
To install PiHole run this command to deploy a lightweight container:
bash -c "$(curl -fsSL https://raw.githubusercontent.com/community-scripts/ProxmoxVE/main/ct/pihole.sh)" |
|---|
When you copy and run this command it will start the install script. Always select the advance installation and if prompted select the GUI install method. When prompted enable all ssh keys and enable ssh.
Make the selections in the GUI by using the output presented below:
After you run the above code block you will get an output like this. - Verify that it matches.
Choose Advanced, set MAC address to BC:24:11:AA:BB:02, static
IP 192.168.1.5/24, and Gateway 192.168.1.1, then finish. |
|---|
Home Assistant OS (LXC 101 - HAOS VM)
Run this command in the Proxmox host shell to automatically build a fully functional Home Assistant VM: When prompted enable all ssh keys and enable ssh.
bash -c "$(curl -fsSL https://raw.githubusercontent.com/community-scripts/ProxmoxVE/main/vm/haos-vm.sh)" |
|---|
When you copy and run this command it will start the install script.
Make the selections in the GUI by using the output presented below: When prompted enable all ssh keys and enable ssh.
After you run the above code block you will get an output like this. - Verify that it matches.
Please set MAC address to BC:24:11:AA:BB:01, IP Address to
192.168.86.251/24, and gateway to 192.168.86.1 |
|---|
NGINX Proxy Manager (LXC 102):
Run this command to deploy a lightweight NGINX container:
bash -c "$(wget -qLO - https://github.com/community-scripts/ProxmoxVE/raw/main/ct/nginxproxymanager.sh)" |
|---|
When you copy and run this command it will start the install script. Always select the advance installation and if prompted select the GUI install method.
Make the selections in the GUI by using the output presented below: When prompted enable all ssh keys and enable ssh.
After you run the above code block you will get an output like this. - Verify that it matches.
🧩 Using Advanced Install on node Promox |
|---|
Ollama AI Engine (LXC 103)
This uses the specialized ollama.sh hardware and software installer path:
bash -c "$(curl -fsSL https://raw.githubusercontent.com/community-scripts/ProxmoxVE/main/ct/ollama.sh)" |
|---|
When you copy and run this command it will start the install script. Always select the advance installation and if prompted select the GUI install method.
Make the selections in the GUI by using the output presented below: When prompted enable all ssh keys and enable ssh.
After you run the above code block you will get an output like this. - Verify that it matches.
🧩 Using Advanced Install on node Promox |
|---|
Load the Agents
In the Prolog Web GUI at http://192.168.86.250:8006 and select Datacenter - Promox - 103 (ollama) in the Server View column
In Container 103 (ollama) on node Promox window select the console
It should log you in without using a password.
If it does not - then log in as root with the password of your Promox server
Enter "passwd" and set the new password the same as your Promox server's password.
The next time you log in it should not ask you for the password anymore.
In this window enter the commands listed below:
1. Load the Primary Voice & Conversation Agent |
|---|
How to Connect Ollama to Home Assistant
For Voice: Install the official Ollama Integration in Home Assistant.
Open the Home Assistant Web Page by going to http://homeassistant.local:8123.
Open your Home Assistant Dashboard.
Navigate to Settings > Voice Assistants.
Create an Assist Pipeline, and assign the qwen2.5:7b model to handle your conversational sentences and smart home exposures.
For Coding:
Point your development environment (like VS Code or Cursor) to your server's IP address (http://192.168.86.250:11434) using a local copilot extension to begin drafting automations locally.
It is highly recommended to use external VS Code IDEs instead of the embedded Home Assistant Integration. You can still connect remotely via ssh and do everything without bogging down your Home Assistant Environment.
Wyoming Docker Installation (LXC104 - Docker)
Step 1: Create a Docker LXC in Proxmox
The easiest way to get Docker running in an LXC is to use the community-maintained Proxmox Helper Scripts, which handle setup and dependencies automatically.
Execute the following command inside of a Putty-SSH window connected to the Promox host.
This must be done in a Putty Shell and not via the Promox web GUI because if the GUI gets changed or dies for some reason the script will be backgrounded. If it is waiting for a prompt, it will never exit.
bash -c "$(curl -fsSL https://raw.githubusercontent.com/community-scripts/ProxmoxVE/main/ct/docker.sh)" |
|---|
When you copy and run this command it will start the install script. Always select the advance installation and if prompted select the GUI install method.
Make the selections in the GUI by using the output presented below:
Ensure you enable all ssh keys and enable ssh, Docker Compose AND install Portainer during the prompt, as you will need it to run your Wyoming services later.
After you run the above code block you will get an output like this. - Verify that it matches.
🧩 Using Advanced Install on node Promox |
|---|
Step 2: Set Up Wyoming Docker Services
Now that Docker is installed in your LXC, you can deploy your chosen Wyoming voice or speech-to-text tools.
SSH into your Docker LXC IP address do not use the Proxmox Web UI Console.
Configure PuTTY for Key Authentication
o Close your current PuTTY session and open a brand new PuTTY
window. |
|---|
Create a docker-compose.yaml file to manage your Wyoming services. For example, to set up the Piper Text-to-Speech and Whisper Speech-to-Text services, run:
mkdir -p ~/wyoming && cd ~/wyoming |
|---|
Paste the following configuration, making sure to replace paths and voices with your preferences:
services: |
|---|
Spin up the containers by typing the following command in you Putty ssh window:
docker compose up -d |
|---|
Step 3: Connect to Home Assistant
Once your Docker containers are running on the Proxmox LXC, you can easily link them to Home Assistant:
Open your Home Assistant Dashboard.
Navigate to Settings > Devices & Services.
Click Add Integration and search for Wyoming Protocol.
Enter the IP address of your Proxmox Docker LXC (192.168.86.248/24) and the corresponding port for the service (e.g., 10200 for Piper or 10300 for Whisper) integrations and associate the following links.
Portainer/Docker changes
Home Assistant Wyoming Integration: |
|---|
Twingate Connector (LXC 105)
Installing Twingate on a Proxmox server is straightforward and highly automated, taking only a few minutes to complete.
Before running the script, you must generate the necessary Connector tokens from your Twingate Admin Console.
Phase 1: Generate Twingate Connector Tokens
Log in to your Twingate Admin Console https:// twingate.com.
If you don’t have an account you will need to create one.
After you are logged in Go to Network > Remote Networks and select your remote network (or create one).
Click to Add a Connector and select the Manual deployment type.
Scroll down and click Generate Tokens.
Copy the Access Token and Refresh Token (you will need these below)
bash -c "$(curl -fsSL https://raw.githubusercontent.com/community-scripts/ProxmoxVE/main/ct/twingate-connector.sh)" |
|---|
Paste the following configuration, making sure to replace paths and voices with your preferences:
💡 Missing jq for script status check. Continuing without
status verification. |
|---|
Post Install Scripts
Proxmox Scripts:
Setting Vi as your default editor
To set vi as the default editor across all containers in your Barnes Home Lab, you can use a bash loop script run directly from your Proxmox host terminal.
Since vi is natively included in almost every Linux distribution (including minimal Debian, Ubuntu, and Alpine templates), this script will work universally without needing to install extra packages.
The Automation Script
Run this complete script on your Proxmox host terminal:
for vmid in $(pct list | awk '{print $1}' | grep -E
'^[0-9]+$'); do |
|---|
What This Script Does
This automated bundle contains the baseline configurations, code layouts, and operational manifests tracked for this module.
👁️ Internal Asset Preview
All embedded diagrams, schematics, and configurations are packaged below. Click the button to download the full-resolution archive block.
Finds All LXCs: Loops through your existing containers (LXC 100, 102, 103, 104, and 105).
Updates Root Profiles: Appends the environment variable to /root/.bashrc for root terminal sessions.
Sets a System-Wide Fallback: Appends the variable to /etc/profile to capture system-wide processes, automation tasks, and alternative shell instances.
How to Apply It to Future Containers
This automated bundle contains the baseline configurations, code layouts, and operational manifests tracked for this module.
👁️ Internal Asset Preview
All embedded diagrams, schematics, and configurations are packaged below. Click the button to download the full-resolution archive block.
To guarantee that any new containers you build in the future also default to vi, run this single command on your Proxmox host to update the global skeleton directory:
echo 'export EDITOR="vi"' >> /etc/skel/.bashrc |
|---|
Code 23: ExportVIasDefault.sh
Twingate Connector
To safely disable password-based SSH logins and prevent brute-force attacks on Proxmox, you must verify your key-based login is working, modify the SSH daemon configuration, and restart the service.
Phase 1: Verify Your Current Setup
Keep your current session open. Do not close your active SSH window until you verify the new changes work.
Test the key login in a new window. Open a second PuTTY window, load your saved session, and click Open.
Confirm success. Ensure you log in automatically without any password prompt before proceeding.
Phase 2: Modify the SSH Configuration File
In your active Proxmox terminal, open the SSH configuration file:
vi /etc/ssh/sshd_config
Press Ctrl + W to search for PasswordAuthentication.
Remove any # symbol from the beginning of the line to uncomment it.
Change the value from yes to no:
PasswordAuthentication no
Press Ctrl + W to search for ChallengeResponseAuthentication (or KbdInteractiveAuthentication on newer Proxmox versions).
Ensure it is also set to no:
ChallengeResponseAuthentication no
Save and exit the file by pressing Ctrl + O, Enter, then Ctrl + X.
Phase 3: Apply and Test the Changes
Apply the new settings by restarting the SSH service:
systemctl restart sshd
Keep this configuration window open.
Launch a completely new instance of PuTTY.
Attempt to log in to your Proxmox server without loading your private key.
Confirm the server rejects the connection with a No supported authentication methods available error.
Open another PuTTY window with your private key loaded to confirm you can still access the server.
If both tests pass, you can safely close your original terminal window. Your Proxmox host is now immune to password brute-force attacks.
Post-Script Configuration Injection
Because helper scripts typically only create the primary interface (eth0 on vmbr0), you can instantly wire up your isolated backend (vmbr1), lock down your resource caps, and configure your pass-through requirements using these post-install snippets.
This is the best way to ensure the entire system is set up correctly.
Run these directly on your Proxmox host terminal right after a script finishes:
Home Assistant OS (VM 101)
Run this because you used the HAOS VM installer to attach your second isolated network adapter:
>>> BASH Script start |
|---|
Pi-Hole Limits (Ensuring it uses the temporary staging IP)
>>> BASH Script start |
|---|
Ollama LLM Engine (LXC 103)
Run this right after the Ollama LXC script finishes to attach the isolated segment and map your 13th Gen Intel iGPU:
>>> BASH Script start |
|---|
Advanced Intelone API & SYCL Tuning Flags
Append these environment flags directly to your Ollama service definition file (usually found at /etc/systemd/system/ollama.service.d/override.conf or directly inside your LXC startup script environment variables):
Add the following environment lines to your deployment:
# Force the Intel driver to bypass aggressive power savings and keep execution units alert
NEOReadDebugKeys=1
OverrideGpuAddressSpace=48
# Tell the SYCL backend to strictly optimize for low-latency single-batch generation
# This prevents the thread-pool from waiting for data batches during quick autocomplete requests
CL_PROGRAM_OPTS="-cl-mad-enable -cl-fast-relaxed-math"
# Direct the GGML backend to pin memory mappings across the virtualized container bridge
OLLAMA_NUM_GPU=999
GGML_OPENCL_PLATFORM=Intel
Wyoming Docker (LXC 104)
Run this to map the isolated network switch so it can talk privately to the Ollama API:
>>> BASH Script start |
|---|
Disaster Recovery:
Text Configuration Backup Script
To secure your precise resource layouts, network definitions, and maps, keep this custom backup tool saved on your host.
Creating the Host Backup Automator
This automated bundle contains the baseline configurations, code layouts, and operational manifests tracked for this module.
👁️ Internal Asset Preview
All embedded diagrams, schematics, and configurations are packaged below. Click the button to download the full-resolution archive block.
Log into your Proxmox Host Shell.
Create the script file:
vi /root/backup_all_configs.sh
Paste the following code:
#!/bin/bash |
|---|
Save and exit (ESC, :wq, Enter).
Make the script executable:
chmod +x /root/backup_all_configs.sh
Execute it at any time to output a fresh, timestamped config snapshot to your host storage directory:
/var/lib/vz/dump/config_backups/
Tools to verify Installation and functionality
How to Quickly Verify Promox Container Configurations:
Sometimes a quick check is needed to verify if there is a problem. For example, you may want to know if a specific Proxmox container can see all your other containers.
You can log into any Promox container via Putty ssh or the Promox web page. In the Promox container select Console and paste in the following code. Or you can open Putty and select the Container you want. In that shell paste in the following code:
#!/bin/bash |
|---|
When you copy and run this simple script in a terminal of your Putty Shell, Proxmox host, or any Linux-based container it automatically verifies that every IP in your config is alive and responsive on your subnet. It will also tell you specific configuration items for each container that you can verify against this output.
After you run the above code block you will get an output like this.
=== VERIFYING HOME LAB NETWORK INTERCONNECTS === |
|---|
- The check boxes show the hosts are correctly configured and can communicate with each other.
References
Proxmox VE installation and administration
These support the ISO installation, VM/LXC terminology, bridges such as vmbr0 and vmbr1, resource allocation, repository configuration, and GPU passthrough sections.
Community installation scripts
The installation commands in the document came directly from the Proxmox Community Scripts project:
Third-party community-maintained scripts. They execute remote shell code, so readers should inspect the scripts before running them.
Home Assistant
These support the HAOS VM, Ollama integration, Wyoming Protocol, and local voice assistant sections.
Ollama and local AI
These support commands such as ollama pull, the local API on port 11434, model names, embeddings, and Home Assistant connectivity.
Docker, Piper, Whisper, and Wyoming
These support the docker-compose.yaml, Piper text-to-speech, Whisper speech-to-text, exposed ports, mounted volumes, and Home Assistant integration steps.
Pi-hole and NGINX Proxy Manager
These support the DNS filtering, reverse proxy, container deployment, and web management sections.
Twingate
These support the connector token, private network access, and secure remote access sections.
SSH and PuTTY
These support Ed25519 key generation, PuTTY .ppk files, authorized_keys, SSH permissions, and passwordless login.
Further Reading