Integrating Home Assistant
Smart Home Edge Systems
- (smart-home-edge-systems.us)
-
They are watching you!
Barnes Home Lab
Table of Contents
Introduction [5](#introduction)
Why Build a Home Lab? [5](#why-build-a-home-lab)
Recommended Design Architecture [6](#recommended-design-architecture)
Basic Home Lab Configuration [6](#basic-home-lab-configuration)
Installing your Home Lab on a Mini-Computer [8](#_Toc233265840)
Step by Step instructions [8](#step-by-step-instructions)
Proxmox VE base layer [8](#_Toc233265842)
Step-by-Step Deployment Guide [8](#_Toc233265843)
PiHole (LXC 100) [10](#_Toc233265844)
Home Assistant OS (LXC 101 - HAOS VM) [11](#_Toc233265845)
Deluge (LXC 102): [12](#_Toc233265846)
Ollama AI Engine (LXC 103) [12](#_Toc233265847)
Load the Agents [13](#_Toc233265848)
How to Connect Ollama to Home Assistant [14](#_Toc233265849)
Wyoming Docker Installation (LXC104 - Docker) [15](#_Toc233265850)
Step 1: Create a Docker LXC in Proxmox [15](#_Toc233265851)
Step 2: Set Up Wyoming Docker Services [16](#_Toc233265852)
Step 3: Connect to Home Assistant [17](#_Toc233265853)
Portainer/Docker changes [18](#_Toc233265854)
Twingate Connector (LXC 105) [18](#_Toc233265855)
Post Install Scripts [20](#_Toc233265856)
Proxmox Scripts: [20](#_Toc233265857)
Twingate Connector [21](#_Toc233265858)
Phase 1: Verify Your Current Setup [21](#_Toc233265859)
Phase 2: Modify the SSH Configuration File [21](#_Toc233265860)
2. Post-Script Configuration Injection [22](#_Toc233265861)
1. For Home Assistant OS (VM 101) [22](#_Toc233265862)
2. For Deluge (LXC 102) & Pi-Hole (LXC 100) [22](#_Toc233265863)
# Pi-Hole Limits (Ensuring it uses the temporary staging IP) [23](#_Toc233265864)
Deluge Drive Mounting [23](#_Toc233265865)
Step 2: Mount the Drive to the Proxmox Host [23](#_Toc233265866)
Step 3: Link the Storage to Deluge (LXC 102) [24](#_Toc233265867)
Step 4: Fix Permissions (Crucial) [24](#_Toc233265868)
3. For Ollama LLM Engine (LXC 103) [25](#_Toc233265869)
4. For Wyoming Docker (LXC 104) [27](#_Toc233265870)
Disaster Recovery: [28](#_Toc233265871)
Text Configuration Backup Script [28](#_Toc233265872)
Tools to verify Installation and functionality [30](#_Toc233265873)
How to Quickly Verify Promox Container Configurations: [30](#_Toc233265874)
References [32](#step-1-create-a-home-assistant-group)
Table of Authorities [33](#table-of-authorities)
🛠️ Index of Source Code Blocks
Code 1: Barnes Home Lab Configuration 7
Code 2: PiHoleInstallCommand.sh 10
Code 3: PiHole Install Parameters and Response 11
Code 4: HAOSInstallCommand.sh 11
Code 5: HAOS Install Parameters and Response 12
Code 6: DelugeInstallCommand.sh 12
Code 7: Deluge Install Parameters and Response 12
Code 8: OllamaInstallCommand.sh 13
Code 9: Ollama Install Parameters and Response 13
Code 10: DockerInstallCommand.sh 15
Code 11: Wyoming Docker Install Parameters and Response 16
Code 12: WyomingDockerCompose.sh 17
Code 13: DockerCompose.sh 17
Code 14: Wyoming-Docker Portainer Stack 17
Code 15: DockerCompose.sh 17
Code 16: HAOS-Wyoming Integrations 18
Code 17: TwingateConnectorInstallCommand.sh 19
Code 18: Twingate Connector Install Parameters 19
Code 19: SetVIasDefault.sh 20
Code 20: ExportVIasDefault.sh 21
Code 21: backup_all_configs.sh 29
Code 22: QuickSystemTest.sh 30
Code 23: Quick System Test Response 32
📸 Index of Pictures
Figure 1: They are watching you! 1
Figure 2: Proxmox VE 9.2.3 / Minicomputer Architecture & Network Diagram 6
**
Introduction
Why Build a Home Lab?
A home lab is essentially a mini data center set up right in your own living space. It can range from a single, low-power mini PC hidden behind a desk to a dedicated server rack filled with enterprise-grade network gear, switches, and uninterruptible power supplies (UPS).
Many people build home labs because they want complete ownership over their data. Instead of trusting third-party cloud corporations with their files, photos, and smart devices, they self-host.
Private Cloud Storage: Running alternatives like Nextcloud to replace Google Drive or Dropbox.
Local Smart Home Control: Using platforms like Home Assistant to manage smart switches, lights, and automated voice clients locally. This ensures your automated routines still work flawlessly even if your internet connection goes down entirely.
Media Streaming: Setting up personal media servers (like Plex or Jellyfin) to stream an owned movie and music collection without relying on changing streaming platform catalogs.
Breaking Things Safely: If you want to learn enterprise network configurations, cluster computing, or test out container environments like Docker, doing it on a production system at work is a massive risk. A home lab lets you experiment, break configurations, and learn how to rebuild them with zero real-world consequences.
Hypervisor Mastery: It provides a space to learn type-1 hypervisors (like Proxmox VE or VMware ESXi) to split one physical machine into dozens of isolated virtual machines (VMs).
Recommended Design Architecture
Basic Home Lab Configuration
A Home Lab self-contained in an inexpensive single mini-computer.
: Proxmox VE 9.2.3 / Minicomputer Architecture & Network Diagram
Note: If you want to use this information in an AI window – select this section into your chat window to reference the entire configuration. This can be helpful if you want to ask any AI questions regarding your Home Lab configuration. Just tell your AI client "gemini" to load this config your reference in your conversation. It might be helpful to tell your AI conversation:
"Please start a clean conversation, flush all buffers and caches and then load this config for reference."
========================================================================= Barnes Home Lab Configuration KAMRUI HYPER H2 MINI PC (10C / 16T | 32GB RAM / up to 4.9GHz) Proxmox VE 9.2.3 / Dedicated Ethernet / Intel Core i7-13620H Integrated GPU: Intel UHD Graphics (13th Gen) / 1TB PCIe NVMe SSD ========================================================================= [ PROXMOX VE HOST ] --------- Reserve 2GB RAM / 2 Threads for overhead ] │ 192.168.86.250 ├──► [ VM 101 ] HOME ASSISTANT OS (HAOS) │ ├── CPU: 2 Cores (vCPUs) │ ├── RAM: 4 GB (Dedicated) │ ├── STO: 32 GB - 64 GB NVMe │ ├── 192.168.86.251 - Primary LAN Segment (vmbr0) eth0 │ └── 10.0.10.1/24 - Isolated Backend Segment (vmbr1 - │ No Gateway/DNS Emulation) eth1 ├──► [ LXC 100 ] DNSMASQ SERVER (PiHole) │ ├── CPU: 1 Core (vCPU) │ ├── RAM: 512 MB (Ultra-lightweight) │ ├── STO: 2 GB NVMe │ └── 192.168.86.254 (Currently .249 until production release) ├──► [ LXC 102 ] DELUGE TORRENT CLIENT │ ├── CPU: 2 Cores (vCPUs) │ ├── RAM: 2 GB (Scalable) │ ├── STO: 4 GB (OS) + Mount point to external storage for media │ └── 192.168.86.252 ├──► [ LXC 103 ] OLLAMA LLM ENGINE │ ├── CPU: 6 Cores (vCPUs) ---> (Uses high-perf Intel P-Cores) │ ├── GPU Passthru: Vulkan0 Intel(R) Graphics (RPL-P) │ type=iGPU total=23.3 GiB Ram │ ├── RAM: 16 GB (Allows up to 8B/11B parameter models) │ ├── STO: 40 GB NVMe --------> (Large capacity for model weights) │ ├── LAM: qwen2.5:7b --> Primary Voice & Conversation Intent │ Parsing Agent │ ├── LAM: qwen2.5-coder:7b --> Complex Automation Engineering, │ Code Sandbox, & YAML Chat │ ├── LAM: qwen2.5-coder:1.5b --> Inline IDE Autocomplete Engine │ (Fed via Desktop on LAN) │ ├── LAM: nomic-embed-text --> Vector Embeddings & Local │ Document Context Parsing │ ├── 192.168.86.253 - Primary LAN Segment (vmbr0) eth0 │ └── 10.0.10.3/24 - Isolated Backend Segment (vmbr1 - No │ Gateway/DNS Emulation) eth1 ├──► [ LXC 104 ] WYOMING-DOCKER │ ├── CPU: 2 Cores (vCPUs) │ ├── RAM: 2 GB (Scalable) │ ├── STO: 10 GB (OS) + Mount point to external storage for │ media │ ├── ports: 10200:10200 │ ├── volumes: piper-data:/data │ ├── 192.168.86.248 - Primary LAN Segment (vmbr0) eth0 │ └── 10.0.10.4/24 - Isolated Backend Segment (vmbr1) eth1 └──► [ LXC 105 ] TWINGATE CONNECTOR ├── CPU: 1 Core (vCPU) ├── RAM: 512 MB (Ultra-lightweight) ├── STO: 2 GB NVMe (OS Only) └── 192.168.86.247 - Primary LAN Segment (vmbr0) eth0 (Routes 192.168.86.0/24 Securely) |
|---|
Integrating Home Assistant
Although this setup may seem complex, you can complete the installation in a day or two and have a complete, running system ready for a production rollout of your new Home Lab.
Step by Step instructions
Step 1: Create a Home Assistant Group
Creating a group makes it easy to manage permissions across your home lab.
In the Proxmox web UI, click on Datacenter in the left sidebar.
Go to Permissions > Groups.
Click Create, name the group HomeAssistant, and click Create.
Step 2: Assign the Correct Permissions
You need to map a role to this group at the root level (/) so Home Assistant can see your system stats.
While still under Datacenter > Permissions, click Add > Group Permission.
To find that elusive "Add" button for permissions, look at that middle navigation column where it says Permissions with the little dropdown arrow.
Instead of clicking the sub-items like Users or Groups, you need to click directly on the main Permissions row itself.
Here is exactly what to do based on your screenshot:
In that middle column, click directly on the word Permissions (right above Users).
Once you click it, the main right-hand panel will change.
At the top of that new panel, you will see a top row of buttons where Add will appear with a dropdown arrow. Click it, and select Group Permission.
Configure these settings:
Path: / (This gives it visibility across the whole cluster)
Group: HomeAssistant
Role: Choose your level of control:
PVEAuditor: Read-only monitoring (CPU, RAM, storage status). Safest default.
PVEVMUser: Monitoring plus basic actions (allows HA to start, stop, or reboot specific VMs/containers).
PVEVMAdmin: Full control over the virtual machines.
Propagate: ✓ Checked (This ensures permissions trickle down to all VMs/nodes).
Click Add.
Step 3: Create the Integration User
Now, create the actual user account tied to the pve authentication realm so it doesn't have local SSH access to your underlying Debian host.
Go to Datacenter > Permissions > Users.
Click Add.
Fill out the fields:
User name: homeassistant
Realm: Proxmox VE authentication server (pve)
Password: Enter a secure password.
Group: Select HomeAssistant.
Expire: Leave blank (never).
Click Add.
Step 4: Generate the API Token for HAOS
An API token is the cleanest way to connect Home Assistant, eliminating the need to expose the user's password.
Go to Datacenter > Permissions > API Tokens.
Click Add.
Select your user (homeassistant@pve) and enter a Token ID (e.g., haos).
Uncheck Privilege Separation so the token automatically inherits the group permissions you just set up.
Click Add.
⚠️ Copy the Secret: Proxmox will display the API Token Value (Secret) only once. Copy it immediately and save it safely.
haos
20945008-0b29-4453-8d1b-cbda92e7f26b
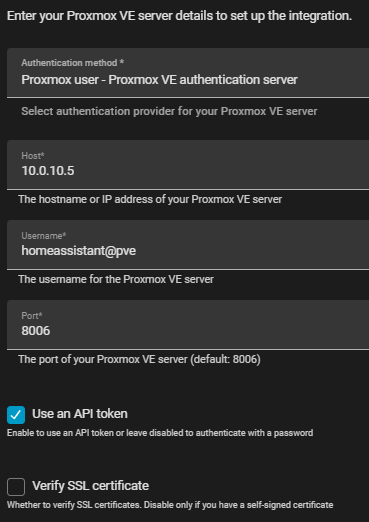
1. Fix the Username Format
When you use an API Token, Home Assistant expects a very specific username format that includes both the realm (@pve) and the Token ID (!haos).
In the Home Assistant configuration screen, split your credentials exactly like this:
Username: homeassistant@pve!haos (Don't just put homeassistant or homeassistant@pve here—the token name must be attached with an exclamation point).
Token ID: haos
Token Value / Secret: XXXXXXXX-XXXX-XXXX-XXXX-XXXXXXXXXXXX (The long string Proxmox gave you when you created the token).
2. Verify Privilege Separation (Most Common Culprit)
If you already formatted the username correctly and it still fails, the API token might be blocking its own permissions.
Go back to your Proxmox web UI.
Navigate to Datacenter > Permissions > API Tokens.
Click on your homeassistant@pve!haos token and click Edit (or look at the columns in the main view).
Make sure Privilege Separation is Unchecked.
- Why? If it is checked, the token ignores the homeassistant group permissions you set up earlier and has zero access rights, causing an instant auth failure.
3. Double-Check the Permission Path
If it still won't connect, let's verify that the token actually has the rights to see the cluster:
Go to Datacenter > Permissions.
Look at the list. You should see a line that looks exactly like this:
Path: /
User/Group/API Token: homeassistant@pve (or the HomeAssistant group)
Role: PVEVMUser or PVEAuditor
If you don't see / mapped to your user or group there, open your Proxmox Shell and force-apply it with this command:
Bash
pveum acl modify / -user homeassistant@pve -role PVEVMUser
Give it one more try in Home Assistant using the homeassistant@pve!haos format, and it should validate perfectly!
Step 5: Add to Home Assistant
With your token ready, jump into your Home Assistant dashboard:
Navigate to Settings > Devices & Services.
Click Add Integration in the bottom right corner and search for Proxmox VE.
Enter your host details and credentials:
Hostname: 10.0.10.5
Username: homeassistant@pve
Token ID: haos
Token Value: [The secret value you copied in Step 4]
Once connected, your Proxmox nodes, virtual machines, and container metrics will instantly populate as native Home Assistant entities.
Create a new area and call it Home Lab.
Add all these devices to that new area
References
Debian Project. (n.d.). Debian GNU/Linux system administration: OpenSSH Server. Debian. https://www.debian.org/doc/
Debian Project. (n.d.). Debian GNU/Linux system configuration: Environment variables. Debian. https://www.debian.org/doc/
DigitalOcean. (2021). Hardening SSH access on Ubuntu 20.04. DigitalOcean Community. https://www.digitalocean.com/community/tutorials/hardening-ssh-fail2ban
E2E Networks. (n.d.). How to enable/disable password-based authentication. E2E Networks Documentation. https://docs.e2enetworks.com/docs/myaccount/security/enable_disable_passwordbased/
Fiala, J. (2020, March 24). Integrating Fedora Toolbox into VS Code (with the help of SSH). Function Over Form. https://jurf.github.io/2020/03/24/vscode-toolbox/
OpenSSH. (n.d.). OpenSSH Server Configuration Guide: sshd_config. OpenSSH. https://www.openssh.com/manual.html
Project X. (n.d.). Security (Level 0, Chapter 4). XTLS. https://xtls.github.io/en/document/level-0/ch04-security.html
Proxmox Server Solutions. (n.d.). Proxmox Virtual Environment documentation: CPU Resource Allocation. Proxmox Server Solutions. https://pve.proxmox.com/pve-docs/pve-admin-guide.html
Proxmox Server Solutions. (n.d.). Proxmox Virtual Environment documentation: User Management and SSH. Proxmox Server Solutions. https://pve.proxmox.com/pve-docs/pve-admin-guide.html
Rackspace. (n.d.). Linux server security best practices. Rackspace Documentation. https://docs.rackspace.com/docs/linux-server-security-best-practices
SyncBricks. (2024, December). How to Generate and Deploy SSH Keys for Proxmox Cluster Login (Passwordless SSH Access) [Video]. YouTube. https://www.youtube.com/watch?v=OkY30sh-vRM
Table of Authorities
Other Authorities
DigitalOcean. (2021). Hardening SSH access on Ubuntu 20.04. DigitalOcean Community. https://www.digitalocean.com/community/tutorials/hardening-ssh-fail2ban 20
E2E Networks. (n.d.). How to enable/disable password-based authentication. E2E Networks Documentation. https://docs.e2enetworks.com/docs/myaccount/security/enable_disable_passwordbased/ 20
Fiala, J. (2020, March 24). Integrating Fedora Toolbox into VS Code (with the help of SSH). Function Over Form. https://jurf.github.io/2020/03/24/vscode-toolbox/ 19
Project X. (n.d.). Security (Level 0, Chapter 4). XTLS. https://xtls.github.io/en/document/level-0/ch04-security.html 20
Rackspace. (n.d.). Linux server security best practices. Rackspace Documentation. https://docs.rackspace.com/docs/linux-server-security-best-practices 20
SecureBits. (n.d.). Linux SSH absichern [Linux SSH hardening]. SecureBits. https://secure-bits.org/en/posts/linux/linux-ssh-absichern/ 20
SyncBricks. (2024, December). How to Generate and Deploy SSH Keys for Proxmox Cluster Login (Passwordless SSH Access) [Video]. YouTube. https://www.youtube.com/watch?v=OkY30sh-vRM 8